Welcome to the beginning of your Journey with Floori 🚀
This isn’t your typical instruction manual, it’s an interactive adventure designed to help you conquer your admin panel like a pro and get closer to rolling out the visualizer with your customers to close more jobs.
We’ve packed this guide with video tutorials, handy materials, and all the support you need along the way. Remember, the setup time is totally up to you. Take charge, explore at your own pace, and feel free to revisit this document anytime to track your progress.
Let’s dive in and make setting up your Floori Portal as enjoyable as possible!
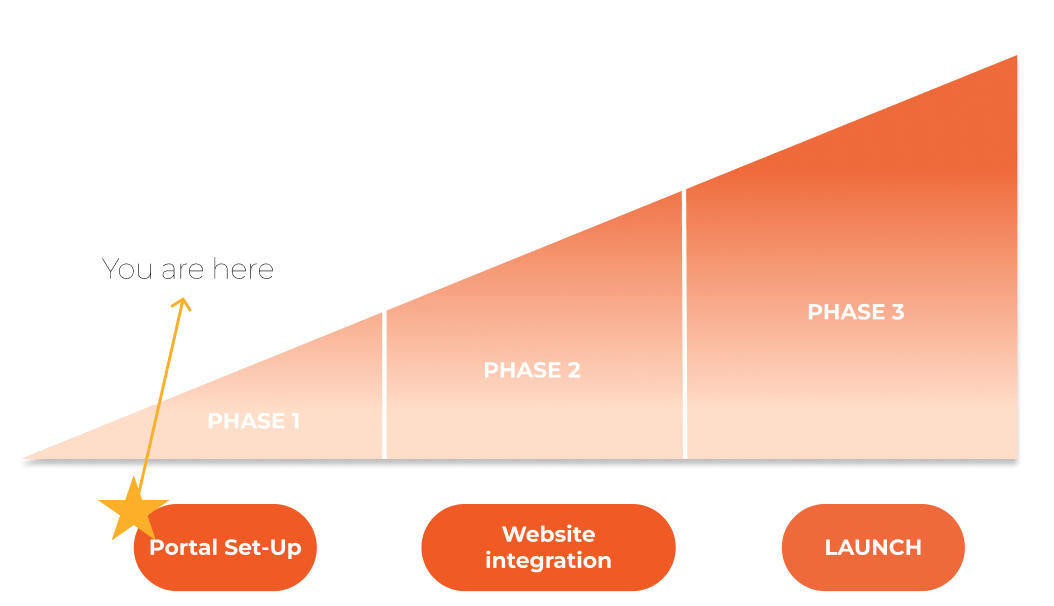
This is your onboarding journey with us
FLOORI PORTAL
Sign-up process
Access the Registration Page
Navigate to the Floori Portal registration page using this link: https://portal.floori.io/register

Create Your Account:
Enter your desired credentials (username/email and password) to create your account.
ℹ️ To ensure full access to all available features, please select the “Distributor/Retailer” option when specifying your “Account Type.” This selection will guarantee that all relevant functionalities are activated for your user profile.

Confirm Your Email Address:
- Check the email inbox associated with the address you used during registration.
- Locate the confirmation email from Floori.
- Click the confirmation link within the email to activate your Floori Portal account.
- You can now log in to the Floori Portal with your new credentials.
Account Settings
Logging Into Your Floori Portal:
- Visit the Floori Portal login page https://portal.floori.io/login
- Enter the credentials you created during registration (username/email and password).
- Click ‘Login’ to access your account.

Add your Logo
Recommended size in pixels → 1200×300

Create your subdomain
What is a subdomain? The subdomain is used to host your Floori Studio [Visualizer], and is formed by adding a prefix to the main domain name.
For example, with your company name as the prefix and ‘http://floori.io ‘ as the main domain, your link to access the visualizer would be: yourcompanyname.floori.io

Check the result, and access your visualizer by clicking the “Launch Floori Studio” button in the top right corner.

Create your catalog structure
To present your products in the visualizer: Here is a video on how to do it:
🎥 Watch: How to Create a Catalog (41 sec)
Explore our reference accounts to find the colors of your epoxy/coatings
Here is the list of the suppliers by country:
Supplier Name | Country | Product Type | Folders in our manufacturer account |
|---|---|---|---|
APC | Australia | Epoxy/coatings |
|
DURABLE | Australia | Epoxy/coatings | Durable Concrete Coatings |
Dulux | Australia | Wall Paintings | Dulux Wall Paintings |
Vinyl Flakes | Australia | Epoxy/coatings | Vinyl Flakes Australia |
Chips Unlimited | CANADA | Epoxy/coatings | Chips Unlimited |
Resinwerks | USA | Epoxy/coatings/Metallics | Resinwerks |
Torginol | USA | Epoxy/coatings | Torginol |
Kretus | USA | Epoxy/coatings | Kretus |
Sherwin Williams | USA | Wall Paintings | Sherwin Williams |
Shaw Floors | USA | Hardwood/ Laminate/ Vinyl | Shaw |
Xtreme Polishing Systems | USA | Epoxy/coatings | Pending Upload |
Leggari | USA | Epoxy/coatings/ Hardwood Overlay | Available by request of Approval Request to Add Reference Account Products through our Help Desk Channel: https://floori.atlassian.net/servicedesk/customer/portals |
Jetrock | USA | Quartz | Available by request of Approval https://jetrockinc.floori.io/ Request to Add Reference Account Products through our Help Desk Channel: https://floori.atlassian.net/servicedesk/customer/portals |
Metallics | All Regions | Coatings | Metallic |
Watch this video to learn how to explore and add the references to your account:
🎥 Watch: Reference A counts (44 sec)
Clone the products from the reference accounts
With the cloning option you can, add the colors to your categories and rename the products if necessary. Watch this video to learn how to clone the products:
🎥 Watch: Cloning Products (1 min)
How to add your products /colors.
You couldn’t find your colors in our system, or are some products missing? Do not worry; you can add your swatches. Here is the information you need:
- 📷 Image guide to prepare the swatches
- 🎥 How to upload your flakes/chips, metallics, etc
- 🎥 How to add base colors
How to create seamless swatches for the software. Can Floori help?
- If the color visualization displays a tile effect after uploading your swatches, you must prepare seamless textures following the recommendations in the image guide.
ℹ️ If you’re short on time or don’t have a team available to create textures, we’ve got you covered! Our expert team can prepare textures and add colors to the system within days of receiving your swatches and payment confirmation. Our onboarding rate is just $6 per color
Contact us through the Help Desk to request our team to prepare the textures and upload the products in the system.
Information you need to prepare to send the request:
- Company Name
- Portal Login Email
- Describe the number of swatches you are requesting to be edited
- Attach the swatches – every swatch should be named after the color name
- Attach images of how the product looks when applied for us to have a reference
- Indicate under which category you would like the colors to be added
Floori Studio Settings
Customize the visualizer interface
Access the “Floori Studio” on the left panel menu and explore all the sections:

Language
Specify the desired languages for the visualizer interface → The information you provide in this section will be visible on the front-end. 🎥 Language

Watermark
🎥 Learn more here. Here are our suggestions:
- Use an image without a background or at least 50% transparency (PNG format)
- Recommended sizes (in pixels):
500×500 or 700×200
Header
🎥 Learn more here. Personalize this section to create a unique and cohesive visualizer that aligns with your brand’s communication style and product offerings. Feel free to modify the image and text in this section. If you’re satisfied with the current version, skip this step.
- Header section on the portal

- Header section on the front-end

Disclaimers
🎥 Learn more here. Do you want to communicate to your customers that this tool is designed to assist them in making informed color decisions for their floors/walls? Or do you prefer to clarify that the tool is for reference purposes only and that the outcome may differ? Utilize the disclaimer section to include the details you wish to convey.
- Disclaimer section on the portal

- Disclaimer section on the front-end

Buttons
Activate or deactivate different buttons in the interface according to your preferences: Get a quote, Custom call to action (WhatsApp, Chat Live, etc), Order Sample, etc. Watch this video for more:
🎥 Watch: How to activate or deactivate different buttons in Floori (38 sec)
Color of the interface
Utilize your brand’s identity colors for the interface by providing the main HEX code. Our system will generate a palette based on this input. 🎥 Watch this video for more

Activation of Default Rooms
In this section, you can select the room scenes you want to be visible in the Visualizer gallery. Tick or untick the boxes according to your preference. 🎥 Default Rooms

Custom Room Scenes – Creation of scenes of your preference
Need more room scenes or ones that better suit your market? We’ve got you covered! Our team can create custom room scenes, complete with mapped floor and wall surfaces for product application. Open a ticket in Help Desk to request our team to prepare the renders. The cost per Room Scene during the onboarding period is $200. Be sure to send us a reference room scene image, and we’ll recreate it to your specifications.
Here are some examples of the custom scenes we’ve prepared for other customers.

Usage
In this section, you can view the number of usages, on how many times your visualizer has been utilized by the users, customers, or installers. Watch this video to learn more:
🎥 Watch: How to activate or deactivate different buttons in Floori (58 sec)
Congratulations!
Implementation check
If you’ve reached this point in the guide, it means you’ve completed all the steps above, and you’re now fully prepared to integrate the visualizer into your website or start rolling it out with your sales team and customers.
Please take a moment to rate your experience with the guide and let us know you’re ready to proceed to Phase 2 of your journey with us: Embedding the Visualizer on Your Website. Let’s review the portal setup together.
- Logo was added [Mandatory]
- Your Subdomain was created [Mandatory]
- The catalog structure was created [Mandatory]
- The products/colors of the reference accounts were cloned and/or new products were added [Mandatory]
- Language [Mandatory]
- Watermark was added [Optional]
- The header section was customized [Optional]
- Disclaimers were added [Optional]
- Buttons were activated according to your preferences→ Get a quote and CTA [Mandatory]
- The color of the interface was changed to fit your brand identity [Mandatory]
- Default Room Scenes were selected [Mandatory]
With everything set, you’re ready to move on to the next step in the integration. Please refer to the next guide title “ Self-Onboarding | Digital Implementation” to learn How to embed the Visualizer on your Website. Access the guide here
Floori Ecosystem Part III: How the Floori Visualizer Enables Manufacturers and Distributors of Engineered Wood, Laminate, LVT/SPC, Parquet, and Vinyl to Drive Customer Confidence and Conversions
Part 3 of 3 — The Floori Ecosystem for Flooring Industry This article is part of our deep-dive into the Floori Ecosystem, which combines three parts that work
Floori Ecosystem Part II: How the Floori Portal Empowers Manufacturers and Distributors of Engineered Wood, Laminate, LVT/SPC, Parquet, and Vinyl to Control Catalogs, Branding, and Product Access
Part 2 of 3 — The Floori Ecosystem for Flooring Industry This article is part of our deep-dive into the Floori Ecosystem, which combines three parts that work
Floori Ecosystem Part I: How the Floori Scanner Helps Manufacturers and Distributors of Engineered Wood, Laminate, LVT/SPC, Parquet, and Vinyl Create True-to-Scale Digital Assets
Part 1 of 3 — The Floori Ecosystem for Flooring Industry This article is part of our deep-dive into the Floori Ecosystem, which combines three parts that work
Why Rug Brands Love Our WooCommerce Plugin (And Why You Will Too)
By Nagham, Floori’s Sales Manager In this article, Floori Sales Manager Nagham shares how the Floori WooCommerce Plugin is revolutionizing rug e-commerce. From real-time product

Introducing the Floori WooCommerce Plugin: Effortless Data Sync & Sales Optimization
We Listened. We Improved. Now, Managing Your WooCommerce Store and Floori Portal Is Easier Than Ever. E-commerce businesses rely on speed, accuracy, and efficiency to remain competitive. However, many

How These Two Companies Are Rocking It With The Best Performing Epoxy Ads (+ How You Can Do It Too)
In today’s digital age, social media has become an essential platform for businesses to reach and engage with their target audience. One of the critical factors in achieving success